 Mehdi takes a brief look at a fascinating study - Zatsiorsky's take on the Fitness-Fatigue Model. After reading Science and Practice of Strength Training
, you'll see why this has become a pivotal part of the Westside approach.
311
Results matching “Bird”
 Here at Straight to the Bar it's been an extremely wet week (always a good thing in Sydney), so there's been plenty of indoor training going on. Between bouts, the following appeared :
- Articles : Darren and Pete explained the process of lifting an Atlas stone, Jedd continued his superb Straight to the Grip Contest series with a look at gripper specialisation and I noted the things to keep in mind when getting yourself a new Power Rack.
- Videos : Diet Blog pointed to the great BBC series The Truth About Food, Rightshape took at look at some of the Shawn Ray Classic's great armwrestling and Zach Ruffo dropped some more speedbag gold.
- DIY : Voting began for the winner or the DIY competition (although there really can't be any losers when there's gym gear being constructed), Tom Moe posted up a video demonstration of his superb 'off helper' and DOD Sports demonstrates a great alternative use for bands - Hartzell Ankle Tractioning.
- Sites : Just a few of the sites added to the feed reader this week - Lady Hardbody (aka 'Queen of the Burpee'), Fight in the Dog (a great look at women's lightweight rowing) and Lori Braun's AthleticTube. Video sharing the way it ought to be.
- Bonus : Via The Final Sprint : Got an old pair of shoes lying around? Consider donating them to the Shoe4Africa Foundation, a non-profit organisation focused on improving health and self-esteem in East Africa.
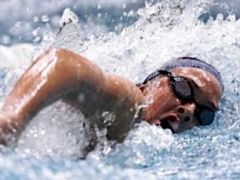 TriSwimCoach's Kevin Koskella takes a brief look at the benefits of bilateral breathing (breathing alternately on each side) whilst swimming freestyle. Very interesting.
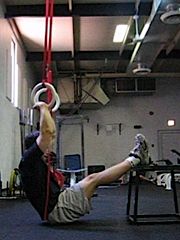 Jim Bathurst updates his superb tutorial on the Muscle-up with a great exercise for the progression - the Support / Block Muscle-up. Will definitely be trying these out.
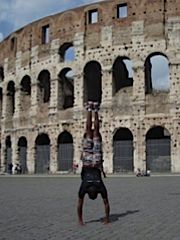 Via Gymnastics Coaching : I love handstands is just one of several interesting handstand groups on Facebook (Jim Bathurst is behind this one, which shouldn't come as a surprise). Rick also mentions the excellent Random Handstands Club - featuring photos of handstands performed in beautiful locations around the world.
 Looking for more kettlebell action? Head over to Taikei's blog (first seen via Fawn's site) and see what three years of solid kettlebell training can do for you.
Photo © 2007 jeffchrisope.
 Physical Strategies points to a great discussion on the 5 × 5 training approach. Definitely worth a read.
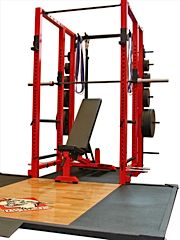 With most of the equipment in my home gym, the current setup is more than reasonable; however I'd probably change a few things if I was starting again. The humble Power Rack - the core of the gym - is no exception to this. If you're about to buy one, here are a few things to consider.
Height
If you're planning on doing any overhead work (Military Press, Overhead Squats etc), you'll need a bit of headroom. This will require both a high ceiling and a tall rack (mine is about 7' tall - high enough to stand in, but I'm forced to do seated versions of the above exercises).
For chin-ups, make sure there's enough room above the rack for your head to clear it comfortably (particularly if kipping's your thing). Also check that there aren't any light fittings overhead (sounds obvious, but you'd be surprised).
Weight, weight stands
Nearly every rack on the market these days will comfortably take several hundred kilos. This is fine for most people, and the small percentage of the population who demand heavier weights (and I really can't blame them) will probably already have their favourite rack picked out. If not, take a look at these over a EliteFTS.
On a side note, it can be extremely handy to have a few bars on the rack itself to hang plates on. Especially once you get into your work sets.
Attaching bands
Whilst you can always loop bands over heavy dumbbells, hooking them directly onto the rack is much, much simpler. If you regularly use bands in your training, a rack with a selection of dedicated hooks or pins is definitely worth looking at.
Spacing of pin holes
One of the things that delineates the cheaper racks from the ones that people are seen drooling over in garages everywhere is the spacing of the pin holes (the holes down the side of the rack that the pins are placed in). Within reason, a smaller gap between the holes allows for a greater degree of flexibility. Anything down to about 1" is fine (the cheaper racks have a gap of 2" or more).
Want to work on your sticking point from just there? Now you can.
NB : the spacing sometimes varies within the one rack. If it does, the finer spacing will most likely be in the middle of the working range; where it can be used to your advantage.
Extra J-hooks, extra pins
By default, many racks only come with a single pair of J-hooks (the hooks the bar sits in just prior to the lift). A second set can be extremely handy - for the other side of the rack (either internal or external).
Extra pins are also extremely handy for restricting the range of motion. For several great ideas on this see the Altering Barbell Kinetics ebook (free) I mentioned a while ago.
Width
Although the width of a barbell never changes (within one type, that is - standard bars are about a foot shorter than their Olympic counterparts), the width of racks vary from brand to brand. The rack's minimum width will depend largely on what you're going to do with it.
Sumo squats and rack pulls will take the most room; somewhere around 40" would be an absolute minimum, but your best bet is to measure your own squat (outside one foot to outside the other).
If you intend to bench press in the rack, or use the bench as a seat for other exercises (such as the overhead work I mentioned earlier), make sure the bench fits. If you're buying them both at the same time, great. Test them out.
One more thing to note with the bench inside the rack - if you plan to use dumbbells from the bench, make sure there's plenty of room to drop the dumbbells once they get heavy. Oh, and something to protect the floor (in the drop zone) is always a good idea - a couple of rubber mats will do nicely.
Optional extras
Whilst the rack is an extremely versatile piece of equipment, there are a few optional extras that are well worth considering. These are :
dip bars : these often hook on to one of the pins, and will stick out from the rack about the same distance as a loaded barbell. alternate solutions make use of the free space in front of the rack.
lat pulldown : whilst this takes up some of your rack's depth, it makes pulldown work nice and accessible.
step-up platform : although you can always use your squat box for these, a dedicated platform is both stable and always there. a great accessory.
storage hooks for bars : these are usually on the outside of the rack (to the rear), and ave very handy if you regularly use several different bars in your training.
storage hooks for bands and chains : these are generally on the sides of the rack (facing out), and are great for hanging the bands and chains you're not using for that particular set.
Overall space in your gym
One final question - how much room will a rack take up in my gym?
As noted above, racks vary a little in size - particularly in width. If you allow enough room to walk around it, you'll be fine. Happy shopping.
 AthleticTube is a video sharing site with an emphasis on the bodybuilding and fitness world, rather than the usual mix of dancing cats and inane acts that seems to gradually creep into other services. As a Lori Braun project there's a healthy dose of female bodybuilding and wrestling in there; as well as a growing collection of boxing and martial arts clips.
Definitely one to keep an eye on.
< Previous 1 2 3 4 5 6 7 8 9 10 11 12 13 14 15 16 17 18 19 20 21 22 23 24 25 26 27 28 29 30 31 32 33 34 35 36 37 38 39 40 41 42 43 44 45 46 47 48 49 50 51 52 53 54 55 56 57 58 59 60 61 62 63 64 65 66 67 68 69 70 71 72 73 74 75 76 77 78 79 80 81 82 83 84 85 86 87 88 89 90 91 92 93 94 95 96 97 98 99 100 101 102 103 104 105 106 107 108 109 110 111 112 113 114 115 116 117 118 119 120 121 122 123 124 125 126 127 128 129 130 131 132 133 134 135 136 137 138 139 140 141 142 143 144 145 146 147 148 149 150 151 152 153 154 155 156 157 158 159 160 161 162 163 164 165 166 167 168 169 170 171 172 173 174 175 176 177 178 179 180 181 182 183 184 185 186 187 188 189 190 191 192 193 194 195 196 197 198 199 200 201 202 203 204 205 206 207 208 209 210 211 212 213 214 215 216 217 218 219 220 221 222 223 224 225 226 227 228 229 230 231 232 233 234 235 236 237 238 239 240 241 242 243 244 245 246 247 248 249 250 251 252 253 254 255 256 257 258 259 260 261 262 263 264 265 266 267 268 269 270 271 272 273 274 275 276 277 278 279 280 281 282 283 284 285 286 287 288 289 290 291 292 293 294 295 296 297 298 299 300 301 302 303 304 305 306 307 308 309 310 311 312 313 314 315 316 317 318 319 320 321 322 323 324 325 326 327 328 329 330 331 332 333 334 335 336 337 338 339 340 341 342 343 344 345 346 347 348 349 350 351 352 353 354 355 356 357 358 359 360 361 362 363 364 365 366 367 368 369 370 371 372 373 374 375 376 377 378 379 380 381 382 383 384 385 386 387 388 389 390 391 392 393 394 395 396 397 398 399 400 401 402 403 404 405 406 407 408 409 410 411 412 413 414 415 416 417 418 419 420 421 422 423 424 425 426 427 428 429 430 431 432 433 434 435 436 437 438 439 440 441 442 443 444 445 446 447 448 449 450 451 452 453 454 455 456 457 458 459 460 Next >