Strongwoman Julie Havelka.
22
Strongwoman Julie Havelka.
The approaches to children's fitness fall under two broad headings :
 Up until now, we have covered the gripper setting techniques that are most widely known in Grip Sports. While these sets allow for the athlete to pre-position the gripper before making the attempt to close the handles together, there are some other techniques that are practiced in which a pre-closing of the gripper is not permitted. These methods are called "no-sets".

 The No-Set technique is very easy to perform. All you really have to do is place the gripper in your hand how you want it, without pre-closing it, and give it a squeeze. The object is, of course, to close the gripper and touch the handles together, but upon trying this technique you will see that it is much harder to pull off because you have not pre-arranged the gripper into a position of optimal leverage. Instead, you have to work the handles the entire way through the range of the sweep.


 The table no-set is even more difficult, in my opinion, than the fundamental no-set gripper close. Again with this technique the close will not be assisted by the off-hand. In fact, with this technique only the squeezing hand is allowed to touch the gripper.
 This is part one of a two-part article on Heavy Sandbag Training. In part one I will cover specifics of building sandbags but will not talk about training, yet. This article is based on my personal experience with sandbags and I will share with you any mistakes I made in the hope you can avoid the same. This article is geared toward someone who is new to sandbag training and who wants to work with weights from 100lbs and up. For people working with lighter weights, the tips on building sandbags may be helpful but you will find more at any of the online sandbag retailers.
Results matching “thumb”
Strongwoman Julie Havelka.
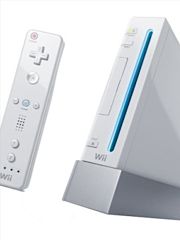
This is the third article (1, 2) in this month's series on Technology and Fitness (a collaboration with Run to Win's Blaine Moore) - the Nintendo Wii.
The approaches to children's fitness fall under two broad headings :

The approaches to children's fitness fall under two broad headings :
- those that encourage children to perform existing activities which are known to produce good results (such as sports in schools, or bodyweight conditioning exercises)
- those that attempt to add a fitness element to activities which are currently enjoyed by children
The Nintendo Wii falls strongly in the latter group. This article looks at the many ways this games console can be - and is being - used which result in increased fitness.
Games
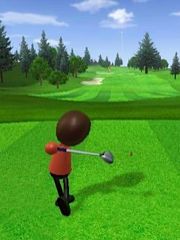
 Wii Sports [E3 demo - streaming, 9.4mb .flv download] captured the public's imagination, surprising many including Nintendo staff. Now it seems as though that was only the beginning.
At last week's E3 in Santa Monica, Nintendo announced the 'Wii Fit' game; a collection of more than 40 activities which are designed to both get you moving and have a good time. Looks great (take a look at the video below for more of an idea of this great game).
Accessories
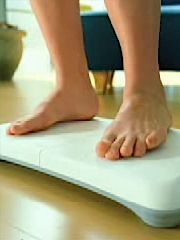
 The 'Wii Fit' game includes a very interesting controller. This controller - a small balance board - is definitely a sign of things to come (scroll down for a full review). Suddenly the distinction between a gym session and play time becomes extremely blurry.
I don't know about you, but I instantly conjured up many game ideas using a device like this. Surfing, a flying carpet ride, luge runs and on and on. Beautiful.
This is the brief video for Wii Fit that was shown at E3. Although the activities themselves may not be quite your thing, the possibilities are incredible.
 Of course, the standard Wii controller (the Wii Remote) also provides a great array of possibilities. Together with existing games it can act as anything from a racquet handle to a fishing rod.
Studies
Via BBC News : a recent study by Dr. Tim Cable at Liverpool John Moores University looked at the energy-burning potential of several video game systems; including the Nintendo Wii. His findings? A definite thumbs up for the Wii; although a healthy dose of more traditional fitness-related activities was also recommended.
Further reading
Review of the Wii Fit balance board
Via Engadget : Joystiq kicks off the shoes takes a look at Nintendo's latest offering.
The Wii Sports Experiment
This is the original Wii Sports experiment, wherein a reasonably fit guy simply adds 30 minutes of Wii Sports to his usual regime. The results are very good indeed.
 This is the third article (1, 2) in this month's series on Technology and Fitness (a collaboration with Run to Win's Blaine Moore) - the Nintendo Wii.
The approaches to children's fitness fall under two broad headings :
- those that encourage children to perform existing activities which are known to produce good results (such as sports in schools, or bodyweight conditioning exercises)
- those that attempt to add a fitness element to activities which are currently enjoyed by children
The Nintendo Wii falls strongly in the latter group. This article looks at the many ways this games console can be - and is being - used which result in increased fitness.
Games
 Wii Sports [E3 demo - streaming, 9.4mb .flv download] captured the public's imagination, surprising many including Nintendo staff. Now it seems as though that was only the beginning.
At last week's E3 in Santa Monica, Nintendo announced the 'Wii Fit' game; a collection of more than 40 activities which are designed to both get you moving and have a good time. Looks great (take a look at the video below for more of an idea of this great game).
Accessories
 The 'Wii Fit' game includes a very interesting controller. This controller - a small balance board - is definitely a sign of things to come (scroll down for a full review). Suddenly the distinction between a gym session and play time becomes extremely blurry.
I don't know about you, but I instantly conjured up many game ideas using a device like this. Surfing, a flying carpet ride, luge runs and on and on. Beautiful.
This is the brief video for Wii Fit that was shown at E3. Although the activities themselves may not be quite your thing, the possibilities are incredible.
 Of course, the standard Wii controller (the Wii Remote) also provides a great array of possibilities. Together with existing games it can act as anything from a racquet handle to a fishing rod.
Studies
Via BBC News : a recent study by Dr. Tim Cable at Liverpool John Moores University looked at the energy-burning potential of several video game systems; including the Nintendo Wii. His findings? A definite thumbs up for the Wii; although a healthy dose of more traditional fitness-related activities was also recommended.Further reading
Review of the Wii Fit balance board
Via Engadget : Joystiq kicks off the shoes takes a look at Nintendo's latest offering.
The Wii Sports Experiment
This is the original Wii Sports experiment, wherein a reasonably fit guy simply adds 30 minutes of Wii Sports to his usual regime. The results are very good indeed.
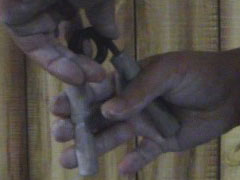
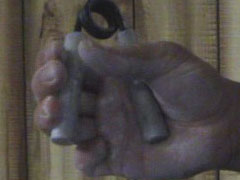
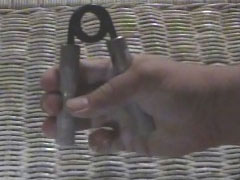
No-Set Close.
Within this category, there are two techniques - the basic no-set, and the table no-set.
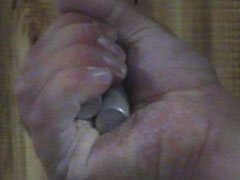
No-Set Close
Open.
Closed.
Now, even though you do not pre-close the handles, you can still place the gripper so that it is in an advantageous position. Naturally, when you attempt a no-set close, you are not just going to haphazardly drop the gripper into your hand and hope your fingers catch it in a good spot. Instead, you should situate it, so that the anchor handle is firmly and squarely set against the thumb pad and the other is favorably in contact with the fingers. This will ensure that the gripper does not slip around in your hand while closing.
No-set closes are one of my main focuses with grippers at this time, and I can see that I progress much slower with no-sets than I do when using a set.
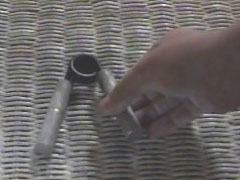
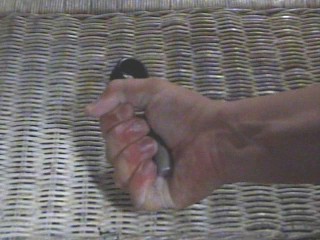
Table No-Set
Table No-Set Close 1.
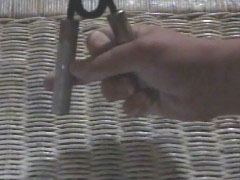
Table No-Set Close 2.
Table No-Set Close 3.
Table No-Set Close 4.
This technique is the one that is required for certifying under the Warren Tetting regulations. You can contact Warren Tetting for a specially made gripper which you can then certify on. To qualify, the gripper must start on a table or other hard, flat surface. The athlete must reach down with the squeezing hand, grab one handle and then wriggle the fingers into position to make the close.
To the best of my knowledge, the athlete must video tape the certification attempt and send it to Warren Tetting himself. Beyond these details, I am not sure, as I have never looked into this certification, although many Gripboard members have done so.
Continue reading Straight to the Grip Contest Part V - The No-sets.
This is a guest article by freakishly strong gripster Jedd 'Napalm' Johnson - Straight to the Grip Contest: Pt V.
Up until now, we have covered the gripper setting techniques that are most widely known in Grip Sports. While these sets, allow for the athlete to pre-position the gripper before making the attempt to close the handles together, there are some other techniques that are practiced in which a pre-closing of the gripper is not permitted. These methods are called "no-sets."
Within this category, there are two techniques - the basic no-set, and the table no-set.
No-Set Close
The No-Set technique is very easy to perform. All you really have to do is place the gripper in your hand how you want it, without pre-closing it, and give it a squeeze. The object is, of course, to close the gripper and touch the handles together, but upon trying this technique you will see that it is much harder to pull off because you have not pre-arranged the gripper into a position of optimal leverage. Instead, you have to work the handles the entire way through the range of the sweep.
Now, even though you do not pre-close the handles, you can still place the gripper so that it is in an advantageous position. Naturally, when you attempt a no-set close, you are not just going to haphazardly drop the gripper into your hand and hope your fingers catch it in a good spot. Instead, you should situate it, so that the anchor handle is firmly and squarely set against the thumb pad and the other is favorably in contact with the fingers. This will ensure that the gripper does not slip around in your hand while closing.
No-set closes are one of my main focuses with grippers at this time, and I can see that I progress much slower with no-sets than I do when using a set.
Table No-Set
The table no-set is even more difficult, in my opinion, than the fundamental no-set gripper close. Again with this technique the close will not be assisted by the off-hand. In fact, with this technique only the squeezing hand is allowed to touch the gripper.
This technique is the one that is required for certifying under the Warren Tetting regulations. You can contact Warren Tetting for a specially made gripper which you can then certify on. To qualify, the gripper must start on a table or other hard, flat surface. The athlete must reach down with the squeezing hand, grab one handle and then wriggle the fingers into position to make the close.
To the best of my knowledge, the athlete must video tape the certification attempt and send it to Warren Tetting himself. Beyond these details, I am not sure, as I have never looked into this certification, although many Gripboard members have done so.
As far as grip contests are concerned, gripper closing techniques can't get much more pure than the Table No-set. Unless the promoter throws the gripper to the athlete and they must squeeze it upon contact, or if it is hung from a string and the athlete must try to close it in one impulsive thrust, or something along those lines; and I just don't see those challenges showing up in grip contests any time soon.
I do not recall any contests where No-sets and Table No-sets were the only approaches allowed in the gripper event. For our contest, the Global Grip Challenge, we normally specify the deepest set allowed and then if the athlete would like to use a shallower set it is perfectly acceptable. For instance, in 2005, we allowed a parallel set, but some athletes chose to use more of a Table No-set grip. In 2006, we changed to the credit card set, but we also allowed a no-set to be utilized for those who were afraid of burning up energy placing a credit card between the handles of the gripper.
Again, I think it is good to be well rounded as a Grip athlete and it will behoove you to train using all the techniques throughout the year. You might even try the toss-and-squeeze technique I mentioned above. But at some point, as the competition draws near, you should transition to a training phase where you specialize on the technique allowed at the contest itself.
Specialization. That is the theme for the next article in this series. Stay tuned. In the meantime, check out DieselCrew.com for all the latest updates. We just introduced a new product there that I know many of you would love to sink your teeth into. Thanks and STAY DIESEL.
Continue reading Straight to the Grip Contest Part V - The No-sets.

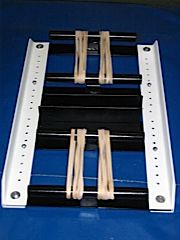
 Another brilliant entry for the DIY Equipment competition - Chris Rice's Horizontal Pinch Device. A few words from the man himself will tell you exactly why I want one of these (and if you train grip, you're probably thinking the same thing) :
Before the build :
One of the problems I have encountered since I began to train grip is pinch training. This is primarily tested and trained isometricly and while I have had some success with it I feel that being able to train dynamically over a full ROM may have several benefits I would like to work with including greater hand health than isometric work only. The TTK, Squeezer, Pony clamp etc work the thumb, palm and fingers but in a way not quite like pinching plates, block weights, climbing or the Euro Pinch apparatus and have a weakness in the lack of use by the whole hand. My hope is to make an adjustable width pinch tool that works in a horizontal direction, has the ability to adjust from extremely wide to as close to zero as possible. I hope to make the face plates high enough for full hand length contact like plates or a Euro setup as well as angle adjustable from square to around the angle to match the sides of a York Blob. It will have adjustable stops for plate adjustment and prestretch on the resistance bands which will allow isometrics as well. It will use regular rubber bands for resistance. I have tried a back to back L configuration in the past but could never figure out how to keep the pinch plates parallel over a wide movement range or avoid the feeling of one side movement. This time I'm using a slide which will be constant over any distance.
and following construction (and use) :
OK - it's done now and I've used it several times now. First, it's very smooth - very smooth, no binding at all. Everything worked out about like I had hoped it would. The horizontal setup feels much more like a block weight or plates, Euro pinch or whatever. With proper tension on each side, both sides move unlike the feeling I have with other devices where one side feels locked and one moves, a couple less bands on the thumb side makes both move together. The angle adjustment is easy, quick, and works nicely. The width adjustment only takes a couple seconds. Changing to isometric mode also only takes a couple seconds. I can relax the tension on the bands easily to keep their strength longer. The movement feels good - better than always squeezing as hard as possible and no movement, hopefully this will be a good thing over time. It can be loaded with small changes in resistance giving a method of measuring progress and strength gains. All in all, I'm very happy with it - only time will tell what gains I will have with it.
Chris, that looks fantastic.
 Another brilliant entry for the DIY Equipment competition - Chris Rice's Horizontal Pinch Device. A few words from the man himself will tell you exactly why I want one of these (and if you train grip, you're probably thinking the same thing) :
Before the build :
One of the problems I have encountered since I began to train grip is pinch training. This is primarily tested and trained isometricly and while I have had some success with it I feel that being able to train dynamically over a full ROM may have several benefits I would like to work with including greater hand health than isometric work only. The TTK, Squeezer, Pony clamp etc work the thumb, palm and fingers but in a way not quite like pinching plates, block weights, climbing or the Euro Pinch apparatus and have a weakness in the lack of use by the whole hand. My hope is to make an adjustable width pinch tool that works in a horizontal direction, has the ability to adjust from extremely wide to as close to zero as possible. I hope to make the face plates high enough for full hand length contact like plates or a Euro setup as well as angle adjustable from square to around the angle to match the sides of a York Blob. It will have adjustable stops for plate adjustment and prestretch on the resistance bands which will allow isometrics as well. It will use regular rubber bands for resistance. I have tried a back to back L configuration in the past but could never figure out how to keep the pinch plates parallel over a wide movement range or avoid the feeling of one side movement. This time I’m using a slide which will be constant over any distance.
and following construction (and use) :
OK – it’s done now and I’ve used it several times now. First, it’s very smooth – very smooth, no binding at all. Everything worked out about like I had hoped it would. The horizontal setup feels much more like a block weight or plates, Euro pinch or whatever. With proper tension on each side, both sides move unlike the feeling I have with other devices where one side feels locked and one moves, a couple less bands on the thumb side makes both move together. The angle adjustment is easy, quick, and works nicely. The width adjustment only takes a couple seconds. Changing to isometric mode also only takes a couple seconds. I can relax the tension on the bands easily to keep their strength longer. The movement feels good – better than always squeezing as hard as possible and no movement, hopefully this will be a good thing over time. It can be loaded with small changes in resistance giving a method of measuring progress and strength gains. All in all, I’m very happy with it – only time will tell what gains I will have with it.
Chris, that looks fantastic.
DIY Sandbag.
This is the year of the sandbag: folks are talking about them, coaches are drilling them, even big budget films are shaping up their extras with this unorthodox training method. Now it's your turn.
Being that it's your first year of sandbag, let me try to clear up a little confusion. Sandbags are a subset of what could be called odd object lifts, Dinosaur Training or Turbulence Training. Sandbag training isn't the whole of any of these things nor do any of these fully encompass sandbags. Sandbags are physical training tools that are malleable in your routine more so than most things and yet harder to train with as well. Sandbags represent strength training and weightlifting at their purest. There are no federations, clubs, suits, belts or even rules. Sandbags remind us that in the real world not every object comes with a perfectly balanced 1" handle, that things are awkward and sometimes even seem to be built to prevent their being lifted.
Hardware:
- Outer bag
- Middle bag (optional)
- Inner bag
- Sand
The outer bag is probably the one ingredient with the most options. Military duffle bags are a popular choice and for a good reason. They are the cheapest bag out there that is durable to take the punishment you're gonna dish out. If you go this route, cut off any buckles and probably the straps too. Depending on the duffle you get, there is a hook at the top to keep it closed. I would cut this off too and consider using rope with a knot in it or duct tape. The reason you are destroying your nice new bag is that your face and body is going to be up close and personal with this bag and there will be weight, sliding and dropping, those actions combined with the aforementioned hazards lead to wounds and lacerations. There are a couple commercially available options out there too. Ironmind makes a great bag that can be bought separately or as part of kit. I personally used this for my first attempts at sandbag training and was very satisfied. There are a couple other manufacturers of sandbags out there. So far, none of them have been designed to hold 150 pounds or more, for that reason, they are not an option for me.
The middle bag is not for everyone. The middle bag is your basic sandbag, the mesh kind that are used keep water at bay, on levees and such. You can order these online or buy them at your local hardware store, you can buy several for a dollar in most cases. I made use of these but you don't have to. These come in really handy if you are still experimenting with weights. I'll cover the difference more in a moment.
The inner bag is always a good idea. This is basically a plastic bag, usually a trash bag, often several of them. The basic idea is that no cloth bag is very good at keeping sand inside. It leaks, it gets in your hair, clothes and carpet. This won't kill you but it gets old. Your sandbags lose weight over time this way too. I actually did not use these in my first pass at sandbags and was just fine but I'm tired of sand in my car so you can bet I'll use them next time.
The last thing you need is some sand. It's as easy as going to the hardware store and buying some. I found it in the aisle with garden and landscape supplies. Ask around if you need help. I used play sand for about $5/50lbs. Some people choose to use pea gravel. It's not gonna be as dense or roll as easily but it works really well, leaks less and is less dusty if you didn't use an inner bag. Obviously you could go out and find sand on the ground too, that is up to you. Personally I like a clean source. Any stick or sharp rocks will wreck your bag and will wreck you, possibly.
You've got your equipment, it's time to get down to the business of building sandbags. There are two ways you can do this,as I alluded to above, I'll talk about them both and you can pick:
Continue reading Heavy Sandbag Training : Part I.